OK so the problem is obvious, the driver’s side view mirror is loose at the base. There is a broken mount. So stay tuned, we’ll have a look.

Broken mount
OK so you’ve seen the problem. This mirror right here has a real bad wobble in it because of a broken mount inside. So what we’re going to do. With just a small handful of tools, is remove the inside door panel and pull off the mirror. So let’s get to work.
OK among the first things to do. There’s a little screw here that holds on that tray and there’s another screw in here which you won’t be able to see unless we bring the camera around to the side here. OK I’m just going to slip my little screwdriver in underneath. Pry up on it. There it is right there and then underneath there are a couple of hex headed screws that I’ll remove with this little socket wrench.


I’m just going to leave it hanging like that because I’m not going to actually disconnect any components. I’m simply lifting the door panel off and I’m going to let it hang. While I get into this area here. This is about the only specialized tool that you’re going to find that you need. It’s made by the Lisle company. You can make your own you just need a piece of flat bar. Cut a little groove in it bend the end of it. For instance here’s the diagram of what General Motors suggests your tool should look like.
Inner door panel
Anyway they’re underneath we start at the bottom here. Just work your way in and get in behind the mounts. I’ll show you what they look like as soon as I’ve got them all undone. I’ll get the door off or the door panel off. OK the last thing is there’s a channel hooking into the door frame here. So you need to be able to just pop the whole thing upwards just like that and it’s free.

You just want to drop that through there and as you can see there’s the inside of your door panel. That this little fellow comes in behind and pops free out of the holes they mount into.
OK these are little foam bushings that are used to cover the access ports. So I’m going to pull them out very carefully. As you can see get in behind it with a screwdriver and chase it out through the front. Chase that one out through the front. Going to go in with our ten mil socket and start undoing the nut. Now one of the problems with a recess like this is. I’m afraid to drop the nut inside the door panel. So what I do is instead of undoing them all the way. I undo them most of the way and then I reach inside with my mechanical fingers…

Tricks of the trade
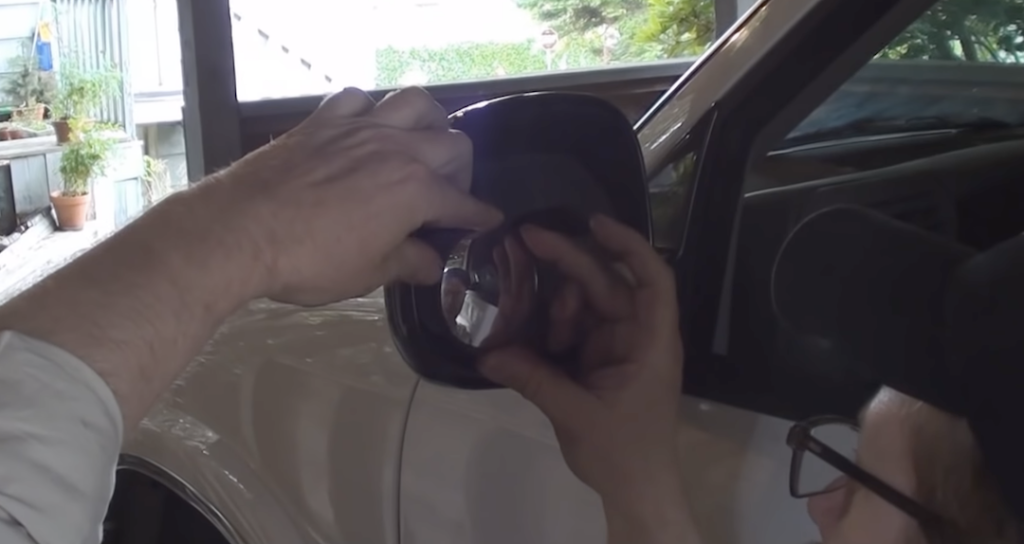
And I undo it the rest of the way with a sure grip on the nut. To make sure I don’t drop it inside the door panel. And there she is. Two more like that and we’re off. And the mirror pulls away nice and easy. Now you can see there’s an electrical connection here. Pull back on this locking tab and it pulls apart very easily. The entire mirror comes off easily in one piece. And as you can see there’s three studs that come out except the third one’s broken.
The service manual calls for fifty three inch pounds. OK now I’m going to show you here on this wheel nut that you can easily put fifty three foot pounds on it with just one hand. Now a foot pound is obviously twelve inch pounds. So it’s twelve times the power we’re going to require on these little nuts over here.

Torque
OK I’ve dialled in fifty three foot pounds. I just wanted to show you how easy it is to make that kind of power never mind the fifty three inch pounds. Which is all you need on the studs to hang our side view mirror. OK so I’ just going to make some power. Let’s just say like that. You see I was only a foot out rather than the actual full eighteen inches. Just do that real quick and prove… you see that? I don’t turn at all and it’s already saying fifty three foot pounds. So I was able to make fifty three foot pounds with just one hand and only twelve inches of leverage.
OK well the weather’s changed on us and it’s cooled off quite a bit. So we’re going to hope that there’s enough light here to do this. Just get started by peeling off the tape and we’re ready to install the new part. OK so you do want to work with the window open, again I’m working through the window for your benefit. I’m just going to peel off the tape that I put over the holes. As you can see here I’ve touched up the paint across here where it’s been worn off by the loose mounting of the mirror.
Sourcing parts
Went to my parts dealer and she was able to just pick it off the shelf in a matter of minutes. Again, I was lucky, if you don’t live in a major metropolitan area like I do you might not be as lucky, you might have to wait a week or two. You can also just go down to your local scrap yard and see if they’ve got it on the shelf often you can get a perfectly fine working piece for a quarter or half the price that you would pay for a new one. So we got all the studs here lined up, got the electrical connection to go through, just pass that through the door.

Now as I said before I’m going to try and limit the amount of torque that I can put behind this nut so I’m going to drop it into a little quarter inch drive socket wrench instead of using the big one you saw me take it off with.
Mechanic’s trick
OK I’ve got my nut loaded in there and it’s safely in place with a bit of shop towel. And I’ll just find the stud. Get it started. OK I’m certain that’s started now so I pull this off so that I can get the shop towel out of there easily and I can put this back on and spin it down just until it’s snug. Once we’ve got all three nuts in place then we can torque them down to spec. Now as you can see I’m trying to limit the amount of torque I apply to this by using a tiny little quarter inch drive socket wrench and choking half way up on it as well.

So we take it up to there’s forty inch pounds and a zero we want to go to fifty-three so I don’t know if you can see this very well but there’s fifty eleven twelve thirteen. Forty and thirteen is fifty three.
Use a torque wrench

Alright I’m going to just torque these down nice and even you want to you want to bring all the bolts snug before you try and apply the torque. I can feel, I’ve developed a feel for it so I sort of know when the spring inside is about to jump. That’s the first one. I don’t know if you noticed it. There’s the second one. There’s all three.
I’m letting go with this hand in order that it doesn’t interfere with the torque I’m applying with this hand and you see I’m doing it with just two fingers of pressure. And that’s what I am trying to impress upon you in this episode is that some things can’t take a lot of power and you can make a lot of power no matter how small you think you are no matter how weak you might believe you are you’re very strong compared to small fasteners and it’s very easy to break them.
Reassembly
So the next step is to put it all back together. The first thing are these foam bushings that are used for soundproofing. You want to just drop them in just enough. Don’t want them to fall through. There’s one, two three they’re just little plugs that cover the access port. OK I’ve got one of these little body panel plugs that I was mentioning. They hang in little bracket/keepers on the inside panel and you can see they’re all barbed and have pointed tips and they go into a… Drop on in and that’s why you need that curved tool. Just get in behind it like that and it just pops right out. Just this little hook, like that kind of deal . You hook it into the door-panel right onto the steel inner door skin.
Sometimes that’s the tricky part. Just pass this baby through there and work on hooking that into the door just like that. Nice and easy. Line that up. Find our little keepers. There’s one down here. One up in here. There we go. The next thing to put together after the door-panel is on is this little plastic piece that holds the door handle release. It also has the actuator for the manual door lock and that’s the tricky part. What you’ve got to do see the actuator there with this little keyhole type slot there. And you’ve got this lock actuator here this rod. And its got to be lined up with that little keyhole slot.

Read the manual
Sorry about the flashlight but its gotten really dark I think it’s going to rain. OK so you want to have both the actuator and the control both in the unlocked position. That’s how they suggest in the manual that you find neutral position for it. Then you’re just going to work your way on from the corner and snap it into place. There we go. And, you can see I got it. So all that’s left is we’re going to drop a little screw in behind there and we’re done.

Spotter mirrors for safety
OK and the last thing I’m going to do is hang a convex “spotter” mirror on the outside lower corner. Because I used to drive a truck for a living. And I learned that the only way to drive is using spotter mirrors on both sides of your vehicle. I don’t care what size of vehicle you’ve got. Even a motorcycle – you want to have convex mirrors on both sides.
Alright as you can see fully operational, the neighbours are all out of bed, it’s been quite a morning. We’ll go for a little drive and I’ll show you what it looks like.